The XUM1541 allows you to connect a Commodore drive to your PC and copy files between the PC and a Commodore disc drive.
Creating and writing disc image is also possible.
The main part of this project is the Arduino ProMicro board that can be found for around $4.50 on ebay.
To program the Arduino you will need avrdude and the project hex (xum1541-PROMICRO-v07.hex) file from project github page.
Now connect the Arduino to you PC and run the following command (press the reset button of the Arduino just before you run the command to enter the programming mode):
avrdude -p m32u4 -c avr109 -P comXX -U flash:w:xum1541-PROMICRO-v07.hex
Change comXX to the correct com port that the Arduino uses.
After everything went well, you should see the XUM1541 in your device manager.
Connect the Arduino to a drive.
only red serial connections and a ground are needed.
The green parallel connections are used for nibbler support and require modification to the drive.
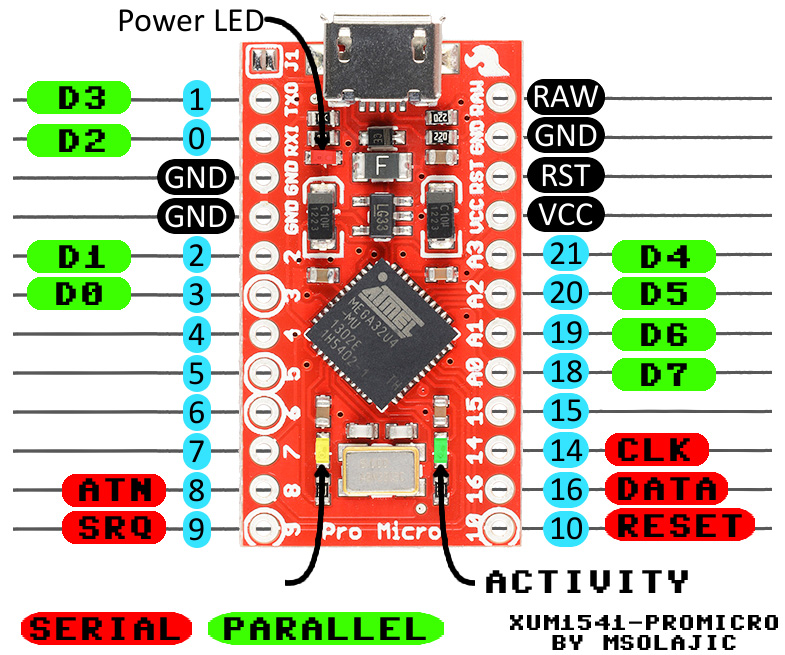
The Pinout of the IEC serial bus is as follows:

After the drive is connected you can use OPENCBM or CBMXfer (don’t forget to copy the OPENCBM files in the same directory as the CBMXfer folder) to transfer data.
Please make sure you use a 32-bit windows version, else it just fail as the drivers are not signed.
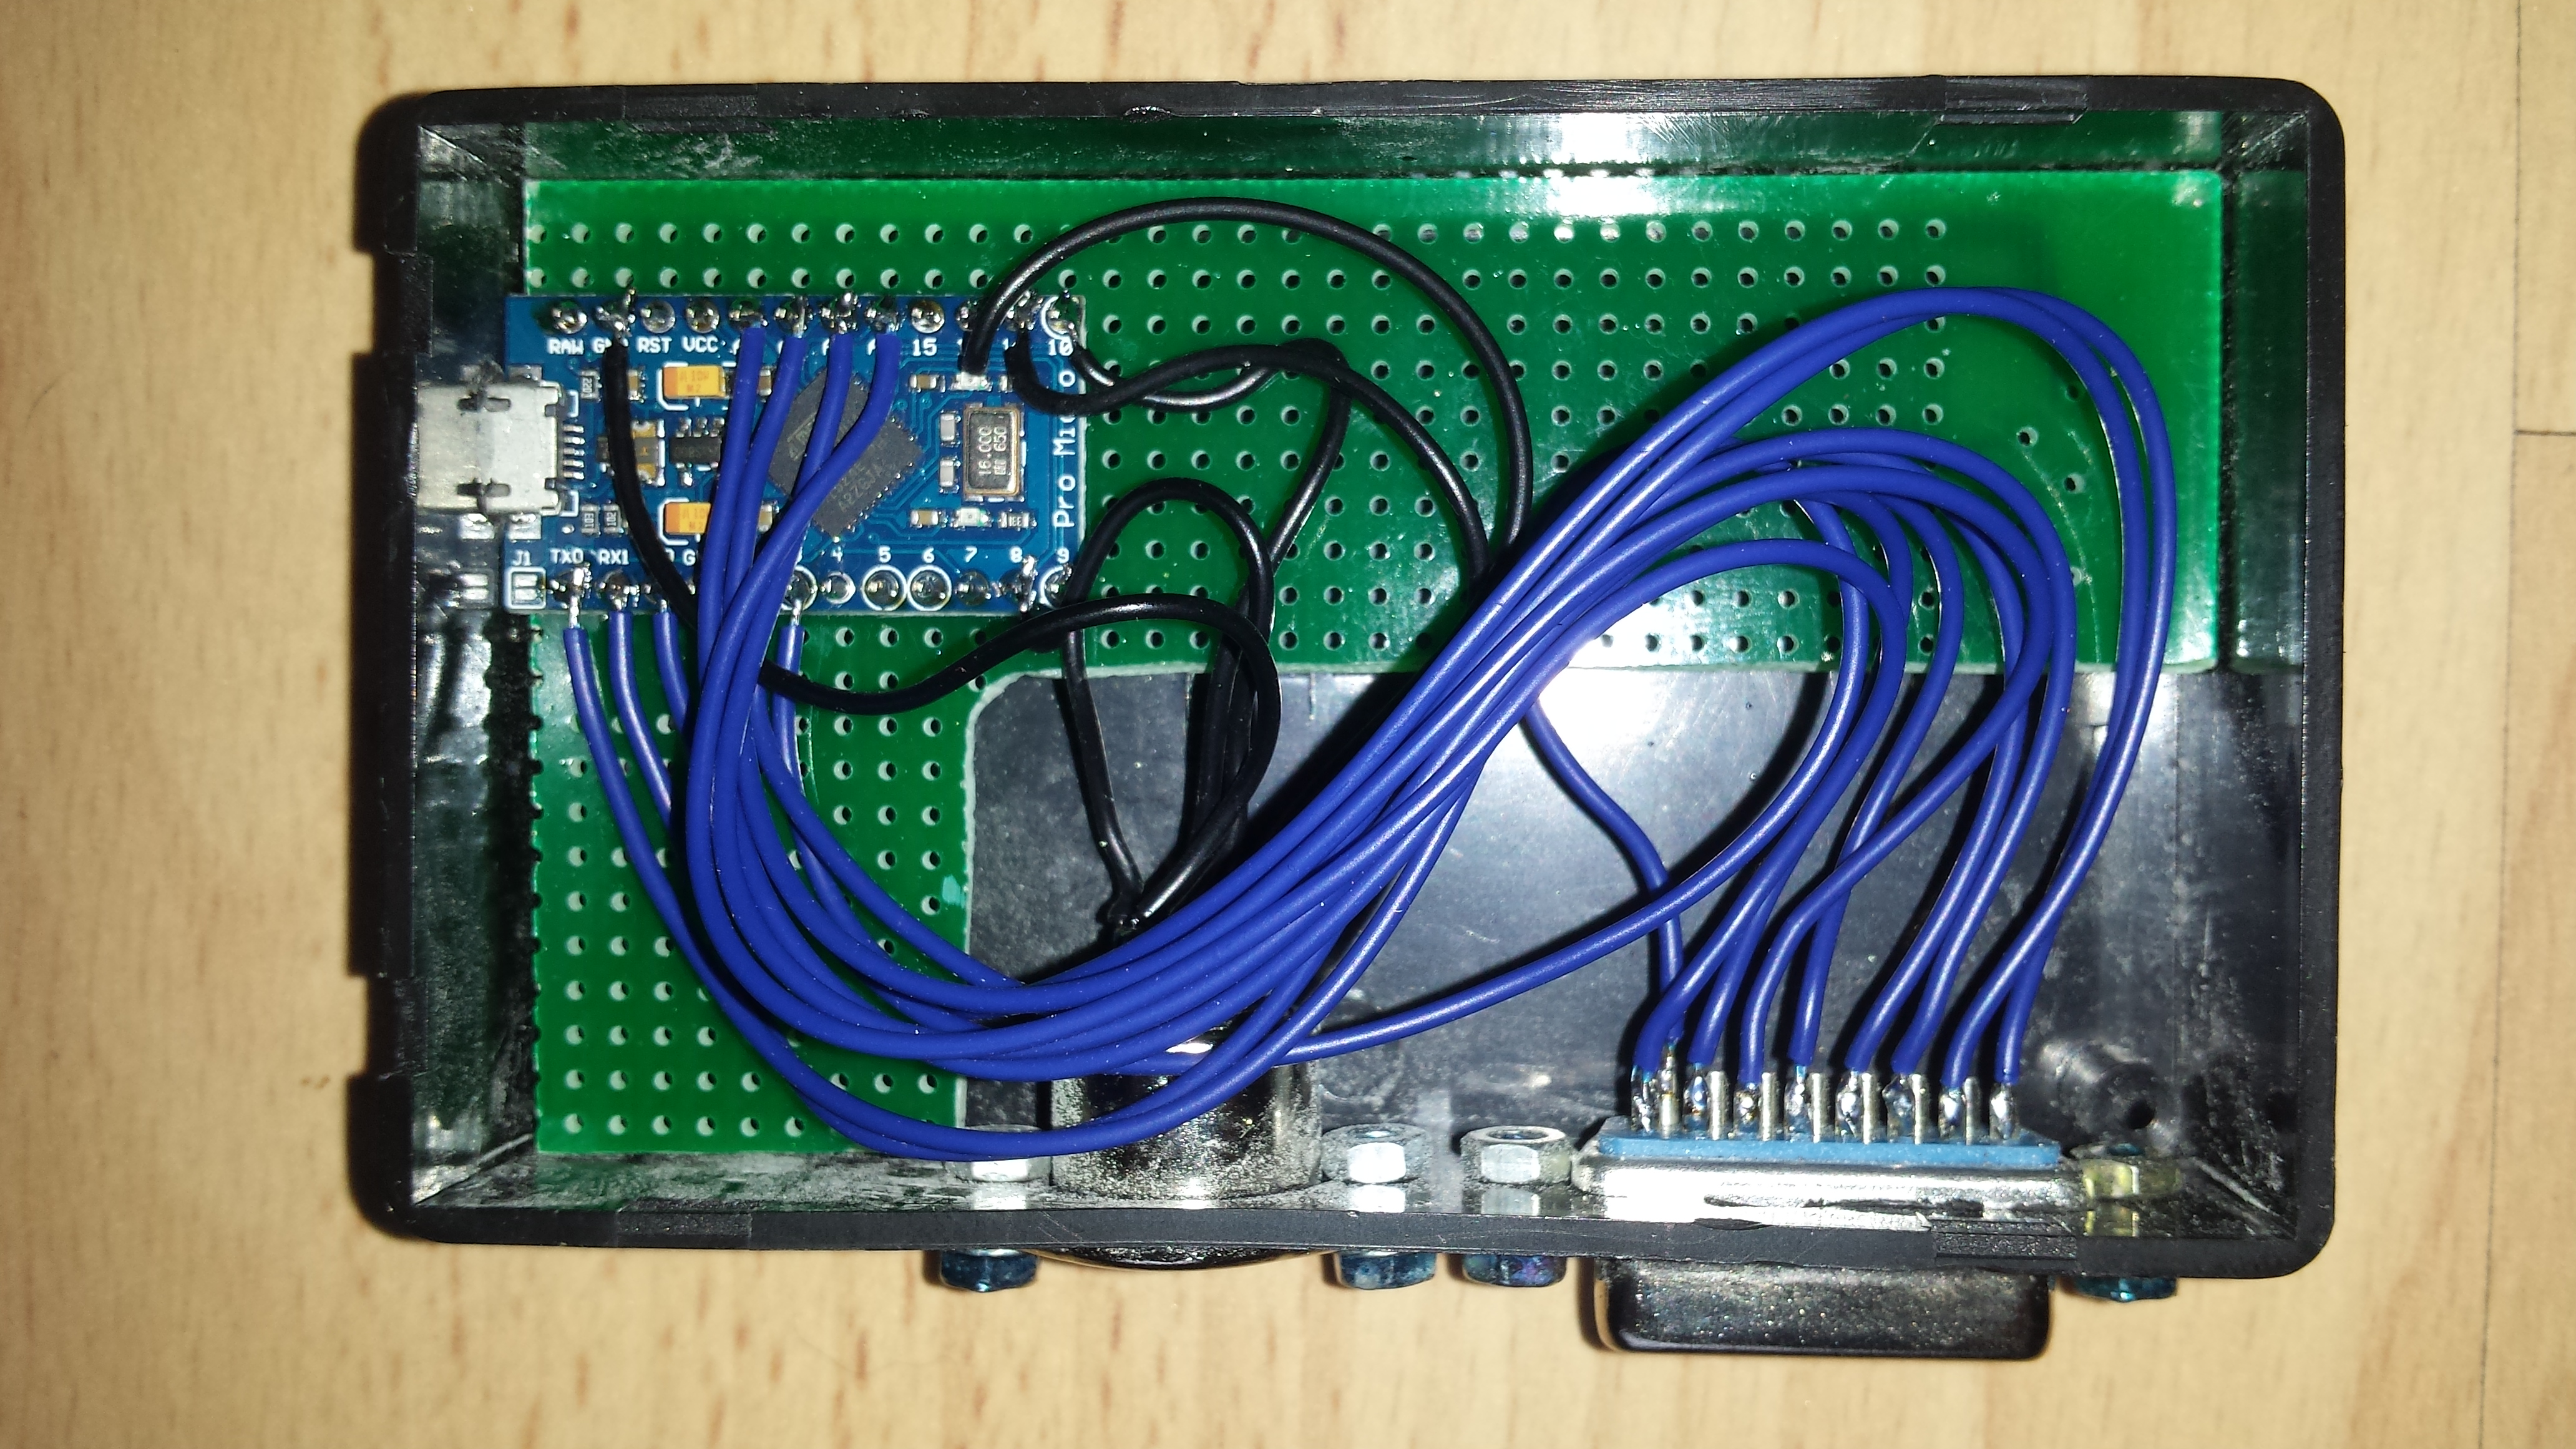
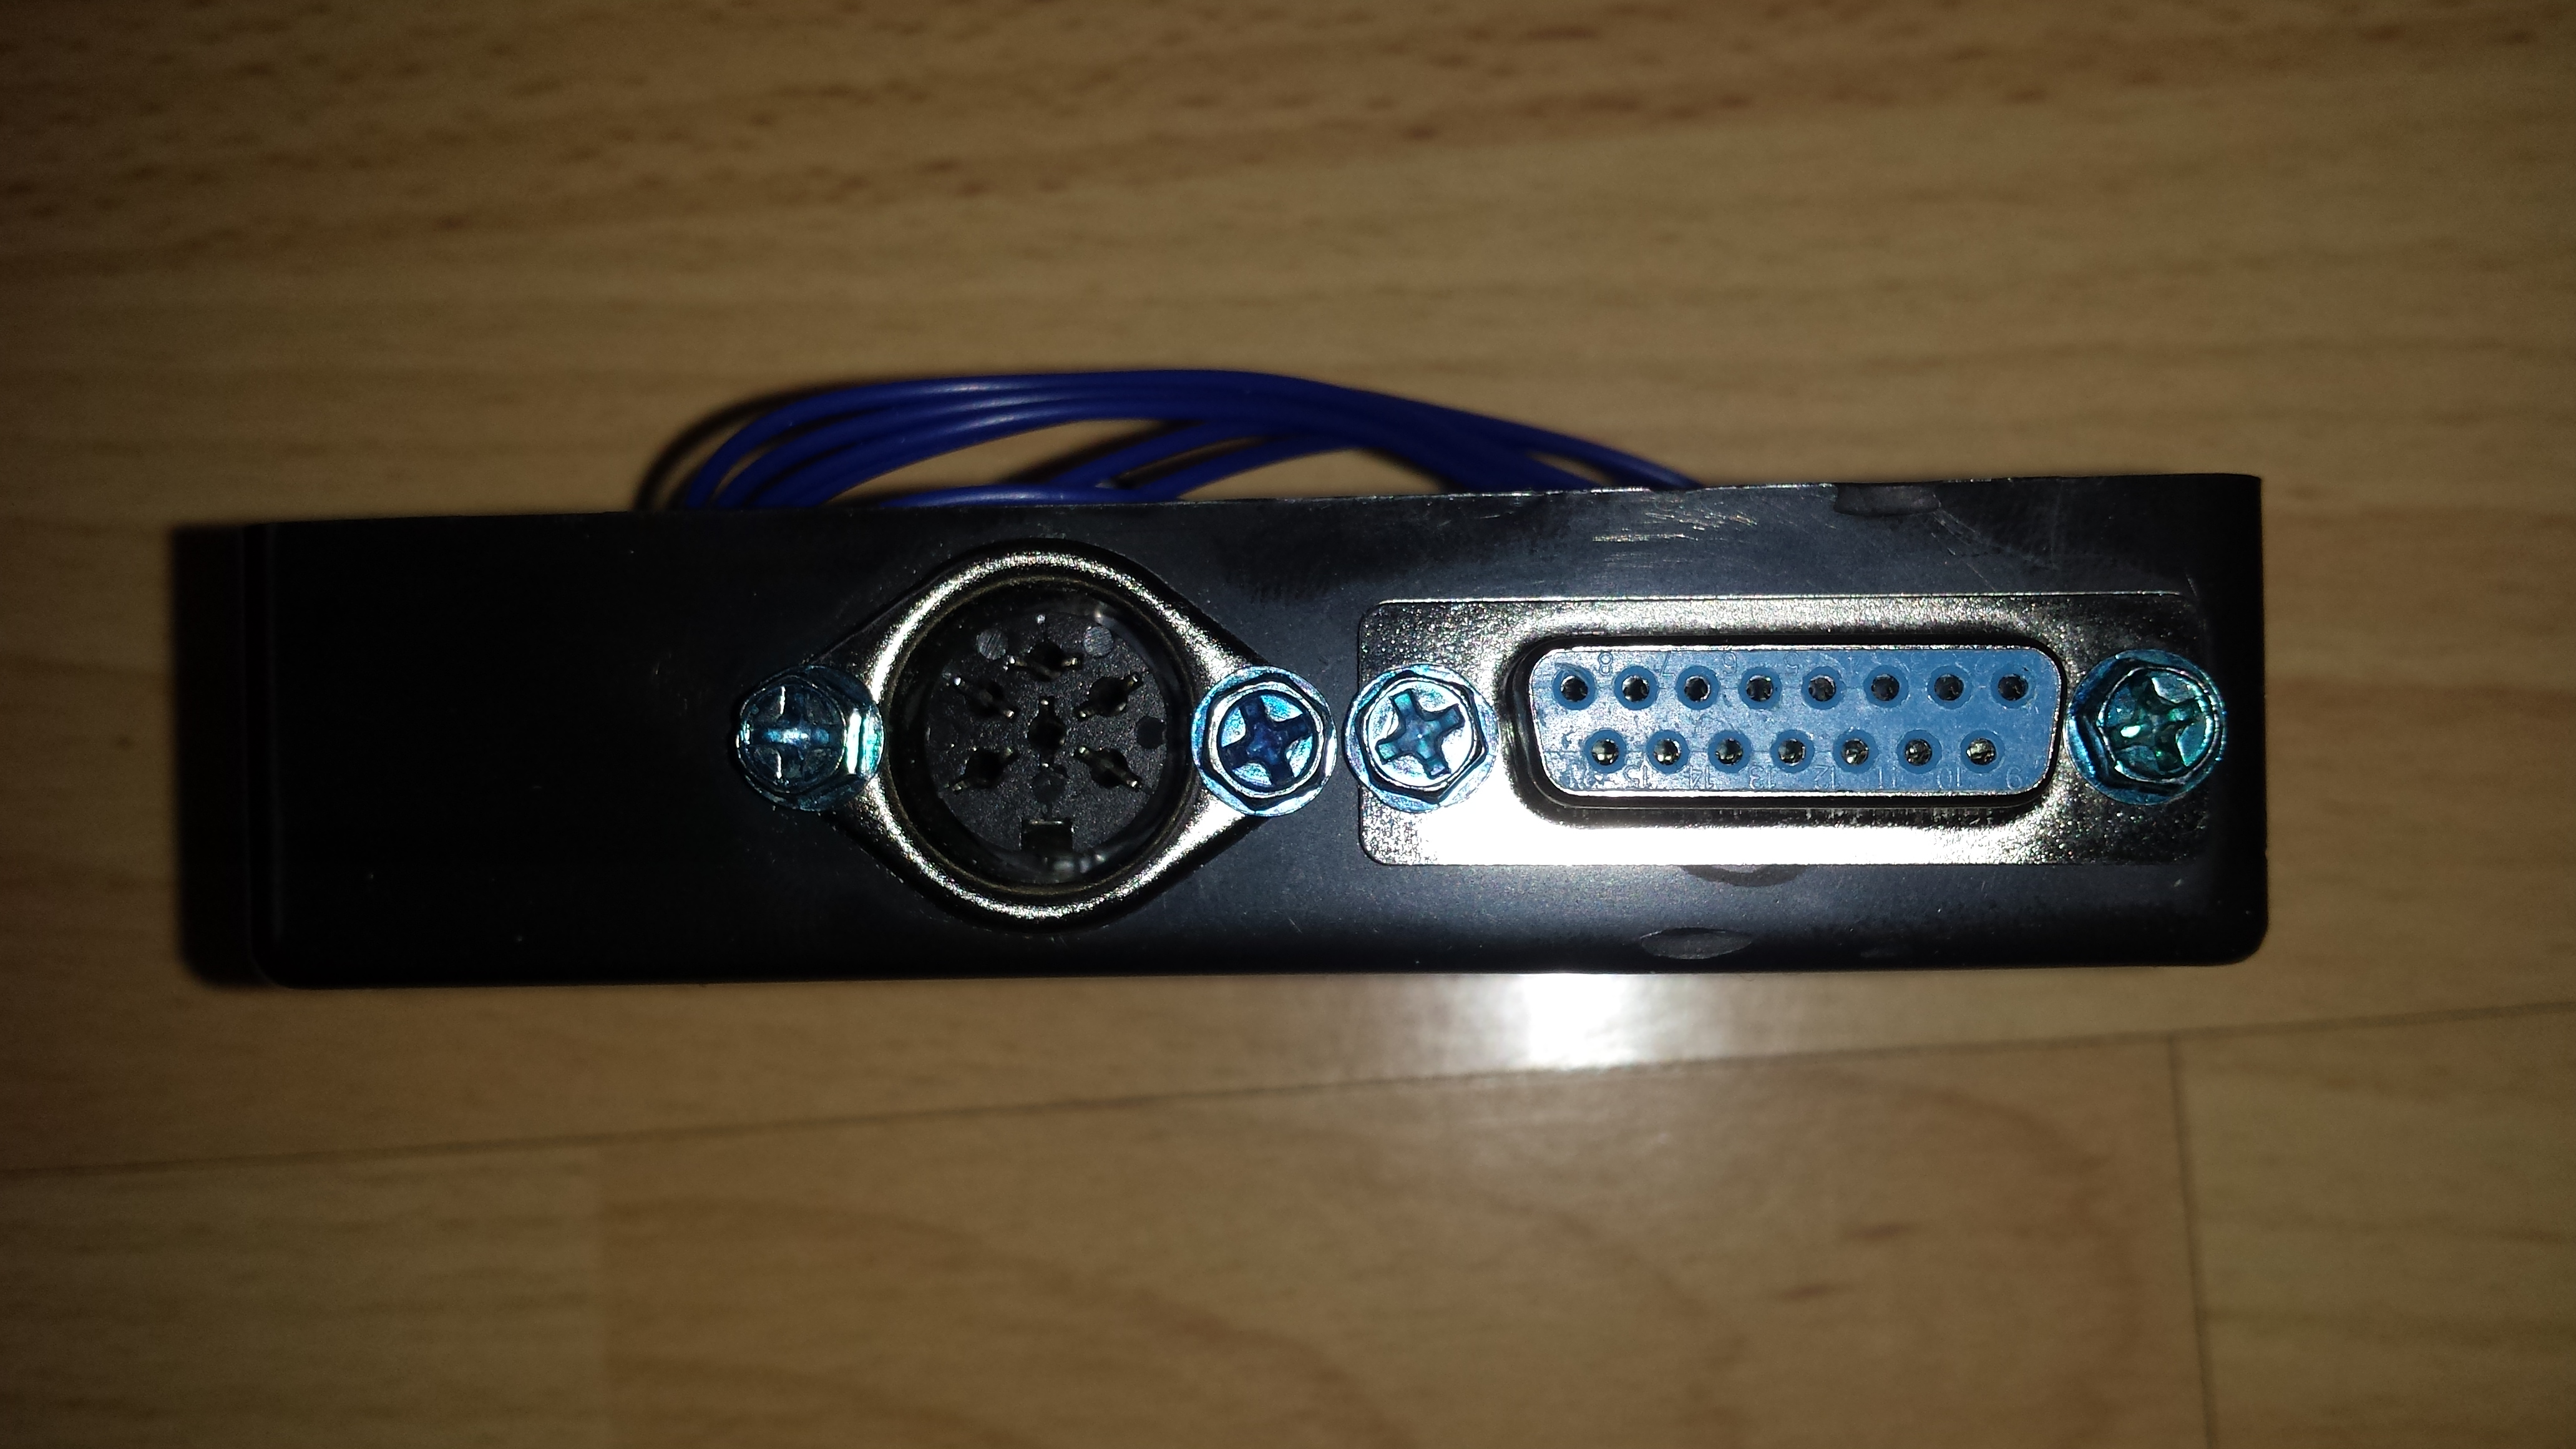
I placed my XUM1541 in a case like shown below.
Sorry but how to programm ARDUINO PRO MINI with ARDUINO UNO? Or USB on AURDUINO PRO MINI? I have a problem. Sorry for me english, i am italian.
Dear Massimo,
I used another Arduino (nano v3) to program the Pro mini.
see electronicsmayhem.com how both Arduino’s are connected.
Programming can be done by the Arduino ide
Jeroen.
thanks for answering. I would like to know which bootloader should I use to be able to enter later in the PRO MICRO HEX file to use as XUM1541. a step by step guide would be helpful to me. thank you again
Dear Massimo,
I got confused with another project where I had an arduino without USB.
Just connect the PROMICRO with the USB cable to you PC and use AVRDUDE to program the PROMICRO.
The command to use is in the item above.
I remember that the programming of the PROMICRO was a bit tricky, you need to press the reset button just before programming it.
After pressing reset, the PROMICRO starts with a bootloader, and can be programed, but if you wait to long, it will enter the program currently programed on the device and programming is not possible until next reset.
after programming you computer should see new device on the USB ports (you may need to unplug it for some seconds).
Tools you can use to transfer data can be downloaded from:
http://www.6502.org/users/sjgray/software/cbmxfer/cbmxfer.html
and:
http://spiro.trikaliotis.net/opencbm
I was able to plan and now the PC will recognize it as me XUM1541 FLOPPY ADAPTER (PROMICRO). I followed to the letter the guides to configure both OPENCBM, CBM4WIN and CBMXFer but is not recognized my 1541 (actually a 1571). My doubt can be whether the PINOUT of the serial are soldered side or not.
The serial pinout shown in the item is the female connector side.
(like when you are looking at the back of a Commodore drive/computer)
I also had some troubles with connecting to the drive at first from my 64-bit windows 7, but after using a 32-bit OS (Windows Vista in my case) I was able to use the drive.
There seems to be a 64-bit signed driver, but I never tried it.
so far I used the XUM1541 to copy some files to and from floppy (1541 and 1581), and use a real drive in Winvice (very slow access).
I still hope to find a 1571 so I can test the parallel nibbler feature.
then how should I connect the male connector on the side of welds?
all good works because I replaced the command of avrdude with STK500V1 instead of avr109 and entered the baud rate 19200, and adding -F to force programming. thank you.
Hallo Jeroen,
Ik probeer de XUM1541-PROMICRO-V07.hex te flashen op een nieuwe Arduino ProMicro, maar AVRDUDE geeft me een verification Error at 0x7000 elke keer.
Daarna verdwijnt de ProMicro uit de device manager en verschijnt de bootloader (arduino leonardo bootloader) pas weer als ik de ProMicro reset.
Wat doe ik fout hier?
Beste Jacco,
Wat ik kan vinden is dat deze error aangeeft dat er te weinig ruimte is in de AVR.
Lijkt me echter niet te kloppen, aangezien het bij mij netjes paste.
Wat je kan doen is kijken of je de laatste AVRDUDE heb (er is een issue wat erop lijkt opgelost in versie 2.2.1) en of een ander (sample) projectje van de arduino ide wel geprogrammeerd word.
Het commando wat je moet gebruiken om de arduino te programmeren is:
avrdude -p m32u4 -c avr109 -P comXX -U flash:w:xum1541-PROMICRO-v07.hex
uiteraard moet je comXX vervangen met de com port waarop de ProMicro gezien word
Laat even weten of het gelukt is.
Jeroen.
Did someone make it work on 64bit Windows? Or, maybe on 32bit virtual system?
Hello!
Can i make it with arduino UNO?
Dear Ivan,
the Arduino UNO and Arduino Pro Micro have a different way of connecting the USB port.
The UNO uses a sepperate chip to communicate to the USB (a Atmel 16U2) while the Pro Micro uses a Atmel 32u4 that has native USB support.
So it won’t work without changing the xum1541 firmware.
Tried to flash a pro micro but getting
avrdude: Error: butterfly programmer uses avr_write_page() but does not
provide a cmd() method.
*** page 127 (addresses 0x7f00 – 0x7f7f) failed to write
ProMicro is now bricked 🙁
Any tips, using windows 10 maybe that is the problem?
Dear Edwin,
I don’t know what went wrong, but I don’t think It’s a Windows 10 problem.
To unbrick your Arduino ProMicro I suggest you visit the following pages:
https://learn.sparkfun.com/tutorials/installing-an-arduino-bootloader
https://learn.sparkfun.com/tutorials/pro-micro–fio-v3-hookup-guide/troubleshooting-and-faq#ts-revive
On the first link there is an option where you use an Arduino to program another Arduino.
This is what I used to program my ProMicro.
Thanks, bootloader fixed.
Programming now succeeds but fails on the verifying.
But i’m a step further 🙂
Solved, error in the hex file 🙂
Thanks for sharing.
I have built a XUM1541 according to your instructions and the following works:
Cbmctrl detect -> works
Cbmctrl status 8 -> works
cbmctrl open 8 15 I0 -> works
Cbmctrl download 8 0xc000 0x4000 1541.rom -> works
But cbmctrl dir 8 does not work and I cannot find the issue.
If I use a XM1541 cable on my Win XP the drive works fine.
Using Macos Sierra and latest cbmctrl. Drive is 1541-II.
Could it be that I have done any soldering incorrect when the rest works or is it more Software issue?
Forgot to mention the error message this is drive not ready.
Hello.
I have built up your beautiful project.
I connected the drive but did not transfer games.
I do command from cbmwin and do not find the drive. The drive after the command has the red light lit up.
I use arduino mini leonardo.
I wrote the file in arduino perfectly.
Do you have some help for me?
Sorry my english but I use online translator
thank you
Hello i tried your tutorial, and ordered a couple of those pro micro. I have problem programming it, when i execute the command all seem to go normally, but when the veryfi process start it show a verify error at 0x7000 value read is 55 and should be 66 (or inverted i do not remember) obiouvsly the interface do not work and isn’t even recognized bt pc (is like nothing is connected). I tried even with an original arduino leonardo, same behaviour and same error. Since there are lot of avrdude versions, what should i use? What i’m doing wrong?
Thanks for help
Did you solve this problem? I have the same issue.
I also got the verification error at 0x7000. I accidentially downloaded the html version of the hex file (by right clicking on the file in the list), which is >200 kByte in size. I had to use the raw file option instead by clicking the “raw” button on the git page. The hex file should be ~23,8 kB in size.
Hello, great tutorial ! Just one question: on the xum1541 source repository, there’s a zoomfloppy-schem-*.png file recommending using a 7406N between the pro micro and the IEC bus. Aren’t there any downside to skipping that?
Thanks!
dear David,
I just build the version I found on the internet and never thought about why other designs use a 7406.
The only thing I can think of is that the 7406 could drive more power on the serial bus, so the system still works when connected with multiple drives connected.
(never had any problems connecting a 1541 and 1581 together with it myself).
Regards,
Jeroen.
Hello Jeroen, thanks for your response. I only need to connect to a 1571 through a 1-meter cable, so I’ll try your method then.
Regards,
David
Hi
your project is very good and works perfectly on my Asus 64bit notebook.
I would like to know how use the nibbler support: is it somehow related
to the parallel cable connected to the 6522 ic used
By Speeddos?
Thanks in advance
Dear Paolo,
I never finished the parallel nibbler cable, but it uses the same unused port on the VIA as Speeddos does.
The only difference is that it only it only uses PA0 to PA7 and speeddos also uses CA2 and CB1 of the same VIA.
As remark I just want to note that on a 1541C, PA2 is used by the drive for track 1 detection.
On the 1541-II PA2 is grounded.
You could use the rom of a older version drive and cut the track to this pin.
Regards
Jeroen.
I have trouble downloading the hex file. Whatever I do it becomes a html link. I know it’s a noob question haha
I need to sort that out soon,but I don’t have access to my computer right now and browsing the github site on a mobile is not the greatest experience.
You could use the download at message 163 of the forum64.de website (where I got the idea from)
Link: Forum64.de
The hex file can be downloaded from the GitHub site (see link in the page).
click on the hex file and then on the right site there should be a button “raw”.
You should see a lot of numbers starting with a colon each row (And no more a header from GitHub).
This is the actual hex file, save this page as a hex file (CTRL-S) and you should have your hex file.
other option is to follow the link on this page, go one level up in the source code, here you should get a “clone or download” button.
With this button, you can download the whole project in a zip file.
Regards,
Jeroen.
Hi.
Thank you for te help with the hex file but there is a problem.
Wen i run avrdude i get the message: invalid file format ‘\xum1541-PROMICRO-v07.hex
error parsing update operation ‘flash:w:f:\xum1541-PROMICRO-v07.hex’
Erik, did you specify that it was a Intel file ?
see also: https://stackoverflow.com/questions/32658448/how-to-give-full-path-name-in-avrdude-command
Hi Jeroen,
Great work i must say.
I only have a bunch of nano boards and not pro.
I have just one question as to the voltage on the serial port, i am trying to order the pro boards, i see there are two models 5V/16Mhz and a 3.3V/12Mhz. I know the 1541 drive has a 5 v serial bus, so would exclude the 3.3v version, but is the clock also critical not sure is the 16Mhz will interfer with the serial communication.
Can you help me out on this
Thanks Ciao Marco
Hi Marco,
The design is not from me, I found it on the internet (https://www.forum64.de/index.php?thread/42525-zoomfloppy-als-billiges-teensy-device/).
Next to the voltage and clock, the nano also has another cpu, so you need to know how to change the pin assignment.
Please see page in the link I included in this answer as they also use more board types (with and without buffer IC).
Regards Jeroen.
Hi Marco,
I’ve only just found this project, I’ve built the circuit and have flashed the firmware from the link you gave, the firmware V08.hex not V07.hex, the problem is that when I install the driver in opencbm (instcbm xum1541) and then run the command ‘cbmctrl status’ I get an error “xum1541 firmware version too high (8 > 7), Please update your OpenCBM plugin”. I am running 0.4.99.99 which is the latest I can find, have you got any ideas as to wha I’m doing wrong??
Dear Ian,
It seams that they created a new hex file (V08). in march this year (2019).
the driver was created to use hardware up to V07, and now sees V08 and refuses to support it (did not try).
a quick search on the internet learned me that there a multiple github pages with a (branch) version of OpenCBM.
some are updated with the V08 version hardware, some aren’t.
I can’t test right now as I just put some commodore stuff in storage (moving to another room, so my son gets the “big” attic).
I think you can do one of the following two things…
– flash firmware V07 to match the software installed (the V08 release info only indicates an timings issue fix for 2031 drives over IEEE)
– find an updated source for OpenCBM, and install that one (https://github.com/OpenCBM/OpenCBM ?)
But again, I can’t test it right now, as I don’t have access to my XUM1541.
Hi Jeroen,
Thanks for the reply, I have been looking for a V07.hex file in the various branches, but none for the Pro Micro that I have found at the moment there are for the BumbleB, Olimex, USBKey, ZoomFloppy! But I’ll keep looking.
Regards
Ian
I still have version 07 for you..
Hi Jeroen, Thanks very much for that much appreciated, I’ll reflash the board
Regards
Ian
I’ve built it and it works like a charm!
However, I have a remark about the programming of the Pro Micro. The procedure as described in the post is not complete. Nowadays, the Pro Micro comes without a reset button, so you have to bridge the RST pin with one of the GND pins to reset the chip in bootloader mode. This gives you 0.75 sec during which your computer has to recognize the bootloader mode, activate the driver and then you can press enter on the command line for flashing. Of course, that’s impossible. The trick is to reset TWICE in very quick succession. This gives you 8 secs of bootloader mode, which normally should be sufficient.
I programmed the chip as follows:
– Connect it to the computer (Windows in my case) in normal mode and let it be recognized. The chip normally comes pre-programmed with a test program, which has the effect that a COM port will be attached to the device.
– Find the COM port assigned to it (hardware manager/ports) and take notice.
– Now double-reset the chip to enter bootloader mode and let WIndows finish installing the drivers. Don’t try to program yet.
– The COM port used during bootloader mode is usually 1 higher than that of normal operating mode. In my case, normal mode was COM38 and bootloader mode became COM39.
– Now you can enter the command line for flashing the hex file. Fill in the right COM port but don’t press enter yet.
– Double-reset the chip again and wait for about 1 sec to have Windows recognize the bootloader mode.
– Now press enter and the programming should start.
WARNING: The V08 doesn’t work at all! This is not a version problem. I cloned the git repository because I wanted to make a little change in the software, but after compiling it didn’t work. So I flashed the pre-compiled V08.hex from git and it also doesn’t work! So if you want to build this cable, use the V07.hex posted by Jeroen a few posts above, that one works flawlessly.
The change I wanted to make is a pin relocation, because I found a board that seems to be made for this cable! Search ebay for “arduino pro micro bs” to find it. It doesn’t have digital pin 8, so I had to relocate it to another pin. Also, the cable I made with this board is IEC only, no parallel.
I’ve done all described in the post and I’ve followed all the advices in the comments … nothing!
I always receive the ansewer from the prompt :”butterfly_recv(): programmer is not responding”.
Many thanks in advance for every advice for my issue.
P.S.: I’ve Win 10
Hi all,
I’ve resolved … but I had write errors during the writing process … and now I’ve a ProMicro unusable: I’m not able to write again on it because it is not recognised by windows. It’s like no port and no usb are showed by the ProMicro … what I’ve done in wrong way?
Many thanks in advance
Dear ATEODORO,
I don’t know why you get write errors on your pro micro, but to reset or revive your pro micro, you may want to read the following page: https://learn.sparkfun.com/tutorials/pro-micro–fio-v3-hookup-guide/troubleshooting-and-faq#ts-reset
Regards,
Jeroen.
Hi,
thank you for publishing this tutorial! I built the adapter according to your instructions and it was a smooth ride. I’m using it on a Linux box with opencbm and it’s almost perfect. Dumping a floppy image in less than 30 seconds using the parallel transfer cable is a bliss. 🙂
The not-so-perfect part is that I need to reset the USB device after every d64copy operation and also after any error situation because the adapter becomes unresponsive. I’m not sure whether the fault is in the opencbm software or in the adapter firmware. Luckily it’s easy to reset a USB device from Linux command line so it’s just an annoyance, not a showstopper.
Hi PYKSY
I wonder how to use parallel cable. shall I use CBMXfer with parallel cable?
Thanks in advance
buenas noches jeroen, mi pregunta es un poco de novato, pero el pro micro no lleva ningun boton de reinicio, me parece o me equivoco, disculpa pero lo observo y no veo el boton de reinicio, quiero comprarlo yá para verificarlo, pero antes te pregunto. gracias desde ya
Dear Alfonso,
If I got the right translation from Google, then your question is why there is no reset button on the promicro.
I think the person(s) that designed the promicro tried to make the pcb as small as possible and adding a button would take a lot of space.
when you look at the pin out, you can see a reset and a ground pin (rst and gnd) next to each other.
when placing a push button between those pins should give you a reset button.
But I never tried it. I always unplug the usb cable and reconnect it to reset.
as I own a Ultimate 1541, the xum1541 is not used that mutch.
Regards,
Jeroen,
My XUM1541 works perfect, but….with CBMTransfer it refuses to scratch or rename a file. I have a 1541-II drive with Jiffydos build in. There is no difference in switching Jiffy on or off at the drive. Any idea?
dear Iwan,
I only can think of 2 things:
-the dos version stored on the disk.
A 1541 writes a 2A to a floppy when it formats it. (can be seen in the top of a directory listing).
When this is changed, a floppy will be readonly (not sure if this is realy a fact).
-A file can be locked ( displaying an < in the directory).
Does any know if this will allow the new Commodore C64 with the usb ports to read from the 1541 using this device?
Dear Brad,
so far I know this will not work.
The XUM1541 is no USB mass storage device, therefor the C64 mini/maxi will not recognize it
Regards,
Jeroen
Has anyone tried to get this hardware configured so it works with a C64 maxi?
Hi Michael,
I have the same question, but I think will be a little hard, unless someone do a change on the firmware of de C64 maxi, I think that will be great.
Regards!!
Great project, I wanted to create but I have to wait for the DIN connectors and have the time to build it.
Also, the first time I flashed the Pro Micro something happen and bricked, after several tries and using an USBSAP programmer I was able to give back to life hehe.
The second issue that I get across was when I downloaded the HEX file was corrupted or when I tried to flash the arduino get corrupted, so just in case I downloaded the HEX again and worked very nice.
Thanks to put it in an easy way.
I have a question for everyone.
Did you try to run a protected game using opencbm and VICE emulator?
I was success to read from VICE the 1541 drive, but not working with protected games.
Thanks and regards!!